5 Tips to Getting Started with Film Photography from a Wedding Photographer!

First of all, what is film? I come from the era of film (hello 1980’s), before digital photography even existed. But if you didn’t grow up with it like I did, you might not know exactly what it is. I started in film photography, I love it, and since I’ve received a fair amount of questions from both clients and fellow wedding photographers, I thought I’d share a bit of what I know and share advice on getting started. This isn’t a technical guide; this is about sharing my love of film and some helpful tips on how to get started.

Film is a chemical emulsion that is painted on top of a transparent plastic (called celluloid), that is rolled up. It is a tangible thing that you load into a film camera. There are many kinds of film for different purposes, both in size and in type, or film stock. Film stocks vary by color, black & white, a variety of experimental films like infrared. They also vary in how sensitive the film is to light. More on that later.
My tips will start with more beginner choices, and gradually move up to more advanced options.
* Disclaimer: As an Amazon Associate I earn from qualifying purchases. My links are all stuff I use!
1. Start with a disposable point-and-shoot camera. Seriously, make it easy on yourself if you’re just starting out. It’s gotta be fun! You may have seen these at weddings, and they are 35mm. You just point, click, and have it developed at a lab. There are little-to-no controls, except for maybe a flash. Chances are a lot of the shots won’t come out great, but there could be some gems. And waiting for your film to be developed is part of the anticipation and magic. There is no instant gratification like we have with our camera phones. The Kodak Fun Saver, here on Amazon, is 800 ISO speed film and comes with 27 exposures.

You may have seen disposable 35mm cameras at weddings. Photo example on the right!
2. If you’d like to level up to having more choices and control of your imagery, then it’s time to buy a plastic toy camera. This is the next level up from a disposable camera, and it’s known as the toy camera, or “Lomography.” These are film cameras made of plastic, are cheap, cute, and fun. Though they can break easily, sometimes on your first roll of film, so beware! The Holga, here on Amazon and comes with a roll of b&w film, is the most well-known example of this kind of camera, and it’s a cult classic. It takes medium format size film (120mm), and is known for having light leaks, which can be a good thing or a bad thing, depending on your personal preference. It also has a soft focus, and has a few manual functions, a step up from the disposable point-and-shoot. It has two aperture settings, and a shutter speed of 1/125th of a second, and Bulb mode. Bulb mode allows the shutter to be open for as long as you hold down the shutter button. This allows for long exposures and for some creative shots. The image below on the far right was taken in Bulb mode. It can also be put on a tripod, and has a hot shoe for an external flash.
The Holga is also fun for shooting multiple exposures on one frame (image example on the left) and you can also switch to Bulb mode if you want some motion blur (image on the right). I tape my Holga up because otherwise the back will just fall off and I’ve ruined an entire roll of film that way. But there is something satisfying about the basicness of the plastic and cheap Holga! (Just don’t call her basic.)

The classic plastic toy Holga camera and some wedding photos taken with it.
3. If you’re looking for more of a professional film camera that has a lot of functionality, there are a lot of choices out there. Though many of the purchasing options are vintage cameras via eBay or vintage camera shops like Glass Key Photo in San Francisco. If you’re a pro photographer, I recommend starting with a 35mm camera that is compatible with your current digital camera’s lenses, if possible. For example, I have the Canon Elan 7e. I got it in good condition, and takes all my Canon EF lenses, has autofocus, auto film advance, auto film rewind, and all the basic settings of a SLR camera. It’s a perfect transition if you’re used to a (digital) DSLR!
For medium format cameras, the wedding photographer favorite is the Contax. It’s no longer made so you can only buy them used. I personally love Hasselblad medium format film cameras, and I own a couple of them (below). They are solid, well-made, and produce beautiful imagery. One model is the older model that is fully mechanical (no batteries or electronics) and only has manual features. I also have a “newer” model, the H1, that came out in 2002. It takes a battery and so it has some convenient features like AF (autofocus), auto advance, and a LCD screen that displays the settings. Both Hassy’s feel like a brick in my hands. So the downside is weight but they are friggen beautiful machines. On my H1 I have the 120mm lens that is like butter, and so beautiful for weddings and portraits. Pentax, Nikon, Mamiya, Leica, Olympus, to name a few, all have made great film cameras in both 35mm and 645 (medium format).

My fully mechanical and older Hasselblad on the left that is square format and shoots 12 frames per roll, and my H1 on the right that is 645 (6x4.5cm) format and shoots 16 frames per roll.
4. How to choose your film stock? Once you have your film camera, try a few different film stocks (types) out. For 35mm rolls you will get 24-36 frames, and for 120mm rolls you will get 12-16 (larger) frames.
What film speed should I use? If you know you’re going to somewhere bright and sunny, like the beach or an outdoor daytime concert, then 100 ISO should be fine. This is a low speed film intended to receive a lot of bright, strong light. So think full sun for 100 ISO film. A high speed film is 800 ISO and up. These are for lower light situations, like low light indoors or evening time. I tend to split the difference and use a lot of 400 ISO speed film, which works slightly better in somewhat low light, but can also be shot in sunny, bright light.
If you are starting out new, I think it’s best to try black and white film first. Your only concern will be exposure of light to dark. This gradation from light to dark is what Ansel Adams is known for, and if you want to nerd out, look into the “Zone System.” In photography school I often used Kodak Tri-X 400, here is a 3 pack on Amazon, which has a medium size grain and good latitude.

Wedding photos taken on expired black and white Kodak 125px, what I like to describe as “milk & cookies.”
What is latitude? It means that the film is forgiving if you don’t nail your exposure! Ilford also makes beautiful black and white films with a finer grain, like Delta. Here is a 2 pack on Amazon. For low light situations, like a wedding reception, Ilford 3200 is awesome.

When you want to try a color film (aka, C-41), my go-to color film stock is Kodak Portra 400. It has warmer undertones, almost golden, and has great latitude. For Portra 400, it’s best to rate it at 200 ISO on your camera, so overexpose by 1 stop. Once you find a stock you like, stick with it for a while and shoot it in different conditions to test the results you get with it. Here is a 5 pack on Amazon. Shooting at least several rolls of a film stock is the best way for you to see its inherent qualities, tones, contrast, and color.

Kodak Portra 400 has warm, golden undertones. All shot on my vintage Hasselblad.

Kodak's golden undertones in its color film looks great on skin!
If you have access to expired film, that can also be fun to experiment with. I have a treasure trove of expired film that I’ve kept frozen or refrigerated from my photo school days. And I occasionally will shoot it as a bonus roll for clients, knowing that it’s no longer reliable. Usually, expired film will have muddier tones and colors can shift. Expired film also has lost sensitivity over time. So it needs a longer exposure than what you may think based on the ISO of the film. But if you’re in a no-pressure situation, it can be fun to try out, especially in brighter light if you can.

Wedding ceremony shot on expired 35mm which yields color shifts and high grain. Taken with a Lens Baby.
5. Use a light meter and take notes.
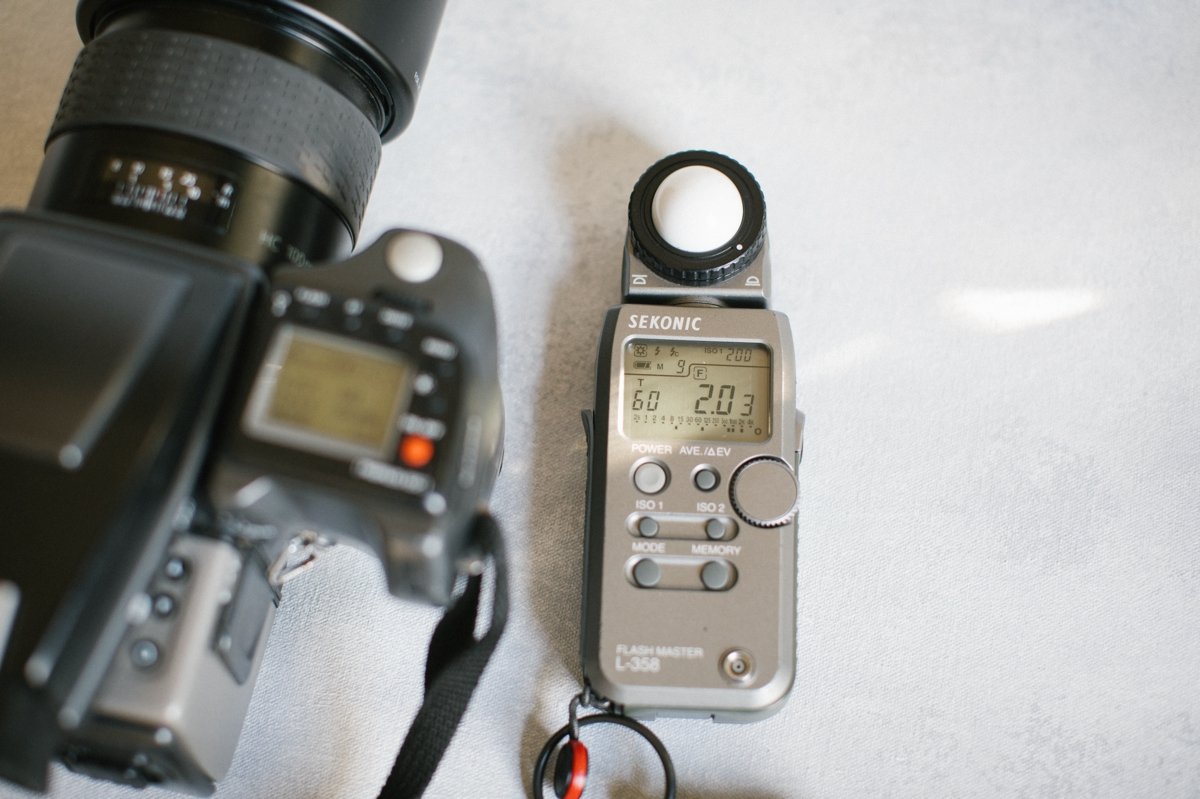
One of my first purchases in my photography 101 class was an incident light meter. I still have and use that Sekonic light meter today! There are other light meters with more features, but since I mostly photograph people, this one works great and is simple. I don’t have a lot of time to be futzing around, so I take a quick light reading and get on with the photographing. Some film cameras have light meters built-in, and older ones don’t, like my more vintage Hasselblad. Even when the light meter is built-into your film camera, the handheld meter will be more accurate. This is the Sekonic light meter I use, on Amazon.
When you’re just starting out, take some notes on the settings for exposure you are making with each roll of film. Unlike digital cameras, there is no metadata once you get your film scans back, and it can be easy to forget what your settings were in those conditions. the notes you took will help you learn what is working and what isn’t, for example if you find that you are consistently underexposing your images.
So why do I shoot film? I get it. It’s expensive, for one. On average, buying a roll of film, processing it in a lab, scanning, and maybe even mailing it to and from the lab, can cost around $60+. That might yield 10-20 good photos. So yes, it’s pricey. But it’s a bit like why some people buy vinyl music over digital. There is just a different, tangible, and unique quality. Film has grain, unlike digital that has pixels. The grain adds a subtle texture and can also have a softer look than crispy digital. For wedding photography, I find that certain film stocks yield a nice skin tone. And black and white film can give a kind of magical and timeless look that I just cannot replicate digitally. It’s like milk and cookies (of the oreo variety). So the differences between digital and film are subtle, especially now with the option of film presets that you can incorporate into your digital photo editing. But it’s also about the process of photographing with film. It slows you down. You know each frame has an actual cost, so you pause, think a bit more methodically, and get into a flow. There is something meditative about it. I personally find film freeing. I’m not looking at the back of my camera to see how each shot came out, like I can do with digital. In time, you just trust yourself and go for it with a more intuitive feel.

Last but not least, here are several film labs I recommend:
Photoworks in San Francisco
Looking Glass Photo in Berkeley
I also mail my film to The Find Lab in Utah. I like their fine-tuned scanning options.
I’d love to hear your thoughts and if you’ve been trying out film! Reach out to me here if you’re interested in working with a wedding film photographer for your wedding!